Beginner Workflow Guide: FL Studio Tutorial To First
Track
Every track you hear shaking a festival stage or filling a club started the same way, with someone opening a DAW for the first time and figuring out where to click. If you're searching for an FL Studio tutorial, you're standing at the exact starting line that countless professional EDM producers once stood at. FL Studio is one of the most popular digital audio workstations in electronic music, used by artists like Martin Garrix, Avicii, and Porter Robinson to build the sounds that define the genre.
But pulling up FL Studio for the first time can feel overwhelming. The interface is packed with windows, knobs, and menus that don't explain themselves. Without a clear path forward, it's easy to spend hours clicking around and never actually finishing a track. That frustration kills momentum, and momentum is everything when you're learning music production.
At RIKIO ROCKS, we cover the EDM scene from every angle, the artists, the festivals, the culture, and the tools behind the music. This guide exists because understanding production deepens your connection to the music you already love. Below, we'll walk you through FL Studio step by step: from navigating the interface and building your first pattern to arranging, mixing, and exporting a completed track. No prior experience required.
What you need before you open FL Studio
Opening FL Studio without the right setup leads to crashes, audio glitches, and frustration that has nothing to do with your skills. Before you follow any fl studio tutorial, including this one, spend 15 minutes confirming your machine and gear are ready. Getting this foundation right means fewer technical headaches and more time focused on actually making music.
System requirements that won't slow you down
Your computer is your studio, and FL Studio puts real demands on it. Image-Line lists the minimum system requirements as a 2GHz Intel Pentium 4 or AMD Athlon 64 processor, 2GB of RAM, and 4GB of free disk space. In practice, those minimums are barely enough to open the software. For actual music production with multiple plugins and samples loaded, you want at least 8GB of RAM, a quad-core CPU, and an SSD with 20GB free.
Running FL Studio on a machine with 8GB of RAM and an SSD will give you a noticeably smoother experience than scraping by on the bare minimums.
Here is a quick comparison of what runs versus what runs well:
|
Spec
|
Minimum (opens, barely)
|
Recommended (works well)
|
|
CPU
|
2GHz dual-core
|
2.5GHz+ quad-core
|
|
RAM
|
2GB
|
8GB or more
|
|
Storage
|
4GB free (HDD)
|
20GB+ free (SSD)
|
|
OS
|
Windows 8.1 / macOS 10.13.6
|
Windows 10/11 / macOS 12+
|
Which FL Studio edition to download
Image-Line offers FL Studio in four editions: Fruity, Producer, Signature, and All Plugins. For a beginner building EDM, the Producer Edition is the correct starting point. It includes the full Mixer, full Piano Roll, all core instruments, and the ability to record audio, which Fruity Edition does not. You can also download a free trial directly from Image-Line's official site that unlocks every feature, with one limitation: you cannot reopen saved projects without purchasing.
Start with the free trial to confirm the software runs cleanly on your machine. When you are ready to buy, Producer Edition includes a lifetime free upgrade to every future version of FL Studio, which makes it one of the most cost-effective purchases in music production software.
Audio gear you need from day one
You do not need expensive equipment to start, but accurate monitoring matters from your very first session. A pair of closed-back headphones in the $50 to $150 range will give you a much clearer picture of your low end and stereo field than standard earbuds. Common choices at that price point include the Audio-Technica ATH-M20x and the Sony MDR-7506.
An audio interface is optional when you are only using software instruments, since FL Studio can output directly through your computer's built-in audio card. Once you add a microphone or a hardware synthesizer, an entry-level USB audio interface becomes essential for clean, low-latency recording. For now, plug in your headphones and set FL Studio's audio driver to ASIO in the settings panel. Windows users without a dedicated interface can use ASIO4ALL, a free utility that reduces audio latency significantly on standard sound cards. That one setting change alone will make the software feel far more responsive when you play notes in real time.
Learn the FL Studio layout in 10 minutes
FL Studio can look chaotic on first launch, but the entire interface revolves around four core windows. Once you know what each window does and how they connect, every step in this fl studio tutorial will make logical sense. You do not need to memorize every button right now. You need to understand the role each window plays so you always know where to go next.
The four windows you use constantly
Every session in FL Studio runs through the same four windows. Learning their names and functions first saves you from clicking randomly every time you want to do something new.
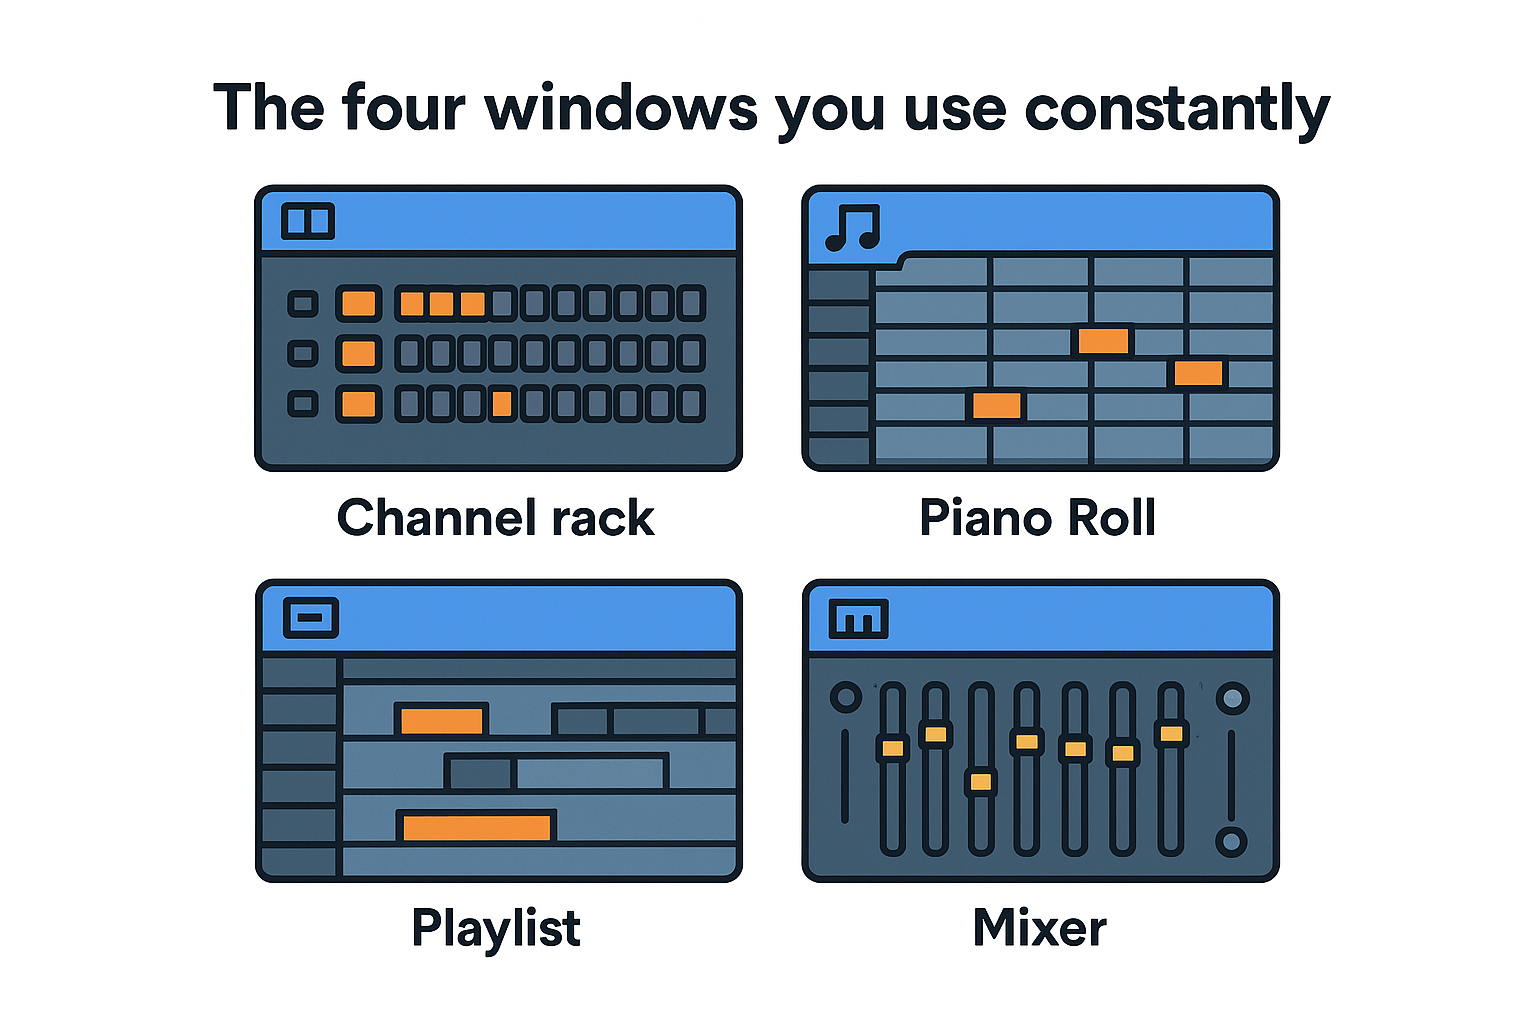
-
Channel Rack: This is where you load instruments and program beats. Each row holds one sound or plugin. You trigger notes visually by placing blocks in the step sequencer.
-
Piano Roll: This is the detailed note editor. Open it by double-clicking a pattern in the Channel Rack. You draw, move, and edit individual notes here to build melodies, chords, and basslines.
-
Playlist: This is your song arranger. Patterns you build in the Channel Rack get placed into the Playlist as blocks. You stack and sequence them across tracks to form a full arrangement.
-
Mixer: This is your audio routing and processing hub. Every instrument and audio track runs through a Mixer channel where you apply effects, adjust levels, and control panning.
Knowing which window handles which job prevents you from wasting time searching for the right place to make a specific edit.
How the windows connect to each other
The workflow flows in one direction: you build sounds and patterns in the Channel Rack, edit the notes inside those patterns in the Piano Roll, then drag the finished patterns into the Playlist to build your song structure. The Mixer sits alongside this entire process, processing audio from every channel in real time. None of these windows operate independently, which is why understanding them together matters more than studying each one in isolation.
You open all four windows from the toolbar at the top of the screen or by pressing their keyboard shortcuts: F6 for the Channel Rack, F7 for the Piano Roll, F5 for the Playlist, and F9 for the Mixer. Keep all four visible on screen from the start so you build the habit of moving between them naturally as you work.
Set your project settings and templates
Before you place a single note, you need to configure two foundational project settings: tempo and sample rate. Skipping this step means you may finish a track only to discover it sounds wrong when played outside FL Studio or does not match the DJ set you planned to drop it into. Getting these settings right at the start of every session is a small habit that saves real problems later in this fl studio tutorial.
Set your tempo and sample rate first
Open Project Settings by pressing F10 or navigating to Options in the top menu. The most important number on that screen is the beats per minute (BPM) field. EDM genres run at very different tempos, so match your target genre before you program a single kick drum.
Here is a quick reference for common EDM tempos:
|
Genre
|
Typical BPM Range
|
|
House
|
120-130
|
|
Techno
|
130-150
|
|
Trance
|
138-145
|
|
Drum and Bass
|
160-180
|
|
Dubstep
|
138-142
|
Your sample rate should be set to 44,100 Hz (44.1kHz) for most projects. This is the standard rate for streaming and digital distribution. Set your bit depth to 32-bit float inside FL Studio for maximum headroom during production, then export to 24-bit or 16-bit when you bounce the final file.
Setting tempo and sample rate before you load any sounds prevents painful pitch and sync issues that are difficult to fix mid-project.
Save a template so you never start from zero
Once your settings are correct, load the instruments and Mixer channels you use in every session and save the result as a template. A basic EDM template might include a kick on Mixer channel 1, a hi-hat on channel 2, a bass instrument on channel 3, and a reverb return on channel 10. This structure means you open FL Studio and your routing is already done, not something you rebuild each time.
To save your template, go to File, then select Save as and navigate to the FL Studio Templates folder. Name it something clear like "EDM Starter 128BPM." The next time you open FL Studio, select that template from the new project screen and you are already two steps ahead before the session begins.
Build your first drum loop in the Channel Rack
The Channel Rack is where every beat in this fl studio tutorial begins. Right-click any empty channel and select "Insert" to load a sampler or synthesizer. For drums, the fastest approach is to load FL Studio's built-in FPC (a pad-based drum sampler) or drag individual samples from the Browser directly into the Channel Rack. Each row you add becomes one drum sound, and the 16-step grid to the right of each row is where you place your hits.
Load your drum sounds
Start with three essential elements: kick drum, snare, and hi-hat. In the Browser panel on the left side of the screen, navigate to Packs, then find a drum sample folder. Drag a kick sample onto the first Channel Rack row, a snare onto the second, and a closed hi-hat onto the third. You now have a three-row drum kit ready to program. Keep your sample selection simple at this stage. The pattern matters more than the sounds right now.
Program the kick and snare first
The most reliable starting point for an EDM kick pattern is to place hits on beats 1 and 3 of the 16-step grid. In FL Studio's 16-step view, those are buttons 1 and 9. Click both to activate them. For the snare, place hits on beats 2 and 4, which are buttons 5 and 13. Press Play and you will immediately hear the four-on-the-floor foundation that powers house, trance, and most EDM subgenres.
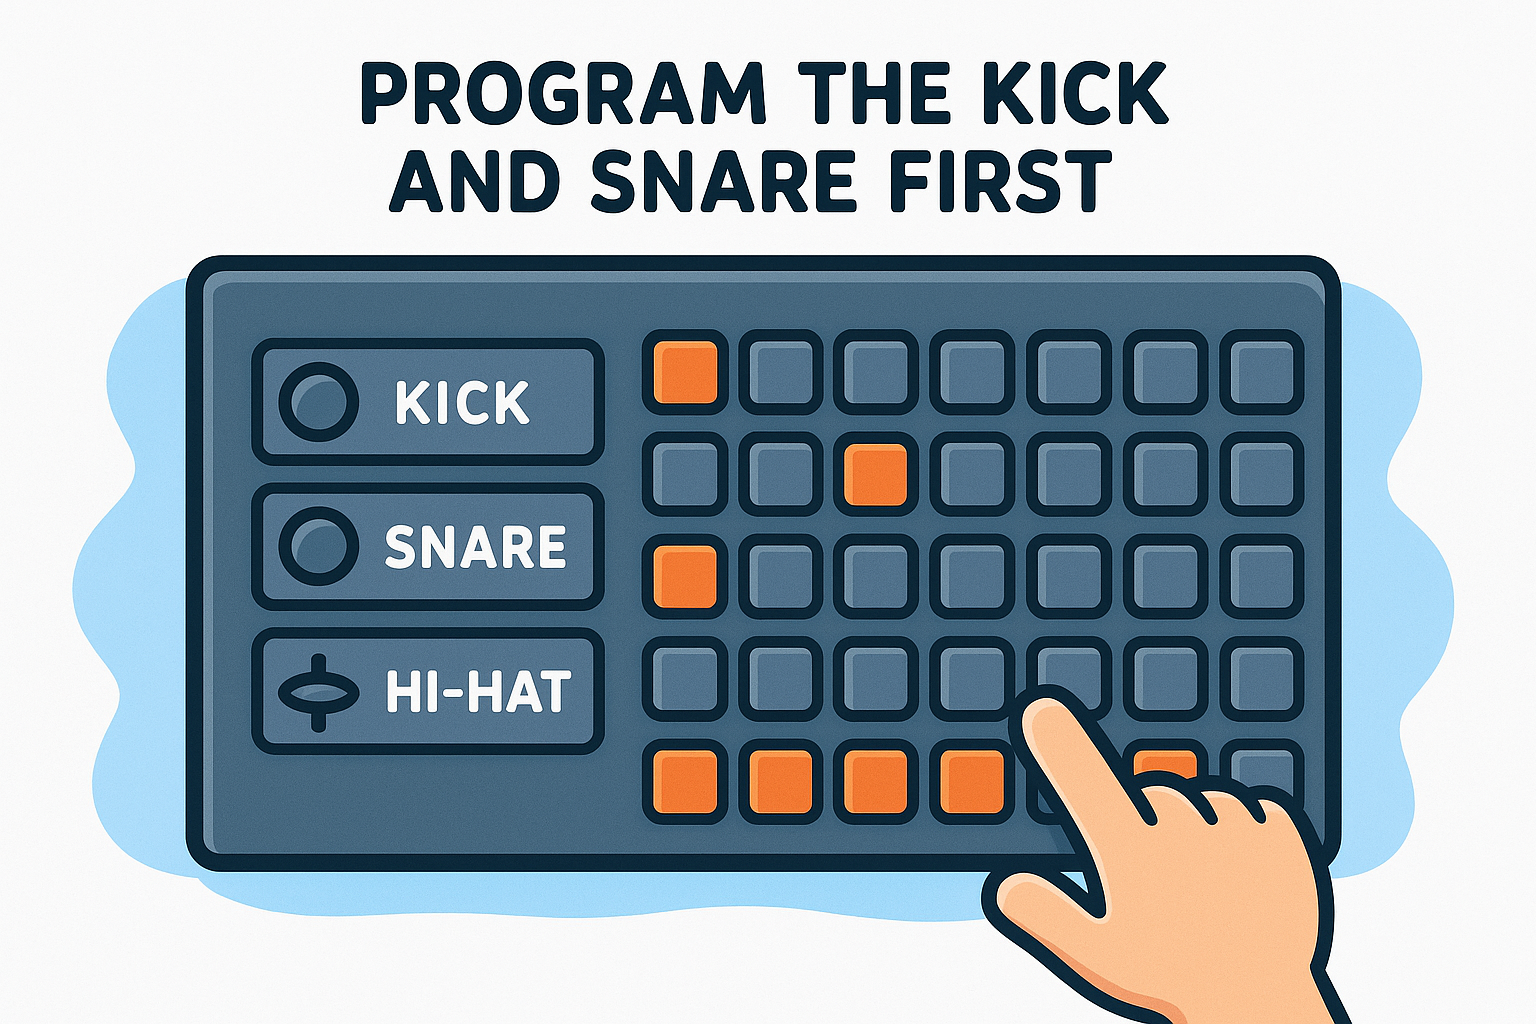
Getting the kick and snare locked in before adding anything else keeps your groove tight and gives you a solid rhythmic reference as you layer sounds on top.
Add hi-hats and vary the velocity
With kick and snare in place, add your hi-hat on every even-numbered step (2, 4, 6, 8, 10, 12, 14, 16) for a standard eighth-note feel, or on every step for a driving sixteenth-note rhythm. Right-click any lit step to adjust its velocity, which controls how hard that hit plays. Dropping the velocity on alternating hi-hat steps creates a natural humanized swing without any additional effort. Once your loop sounds right, right-click the pattern name at the top of the Channel Rack and rename it "Drums" so it stays organized when you move into the Playlist.
Write chords, bass, and melody in Piano roll
The Piano Roll is where your track gains harmonic identity. To open it, double-click any non-drum pattern in the Channel Rack and the Piano Roll launches in a new window. The vertical axis shows pitch, with higher notes at the top and lower notes at the bottom. The horizontal axis shows time, measured in bars and beats. You draw notes by clicking anywhere on the grid, resize them by dragging their right edge, and delete them by right-clicking. Everything you build here feeds directly into the Playlist as a finished pattern.
Build a chord progression first
Start with chords before anything else because harmony defines the emotional direction of your track. A minor key works well for most EDM subgenres. Try the progression Am, F, C, G in the key of A minor. In the Piano Roll, set your snap to 1 bar and draw each chord as a block of notes lasting one full bar. For Am, stack the notes A3, C4, and E4. For F, stack F3, A3, and C4. Repeat this four-bar pattern twice and you have an eight-bar loop that already sounds musical.
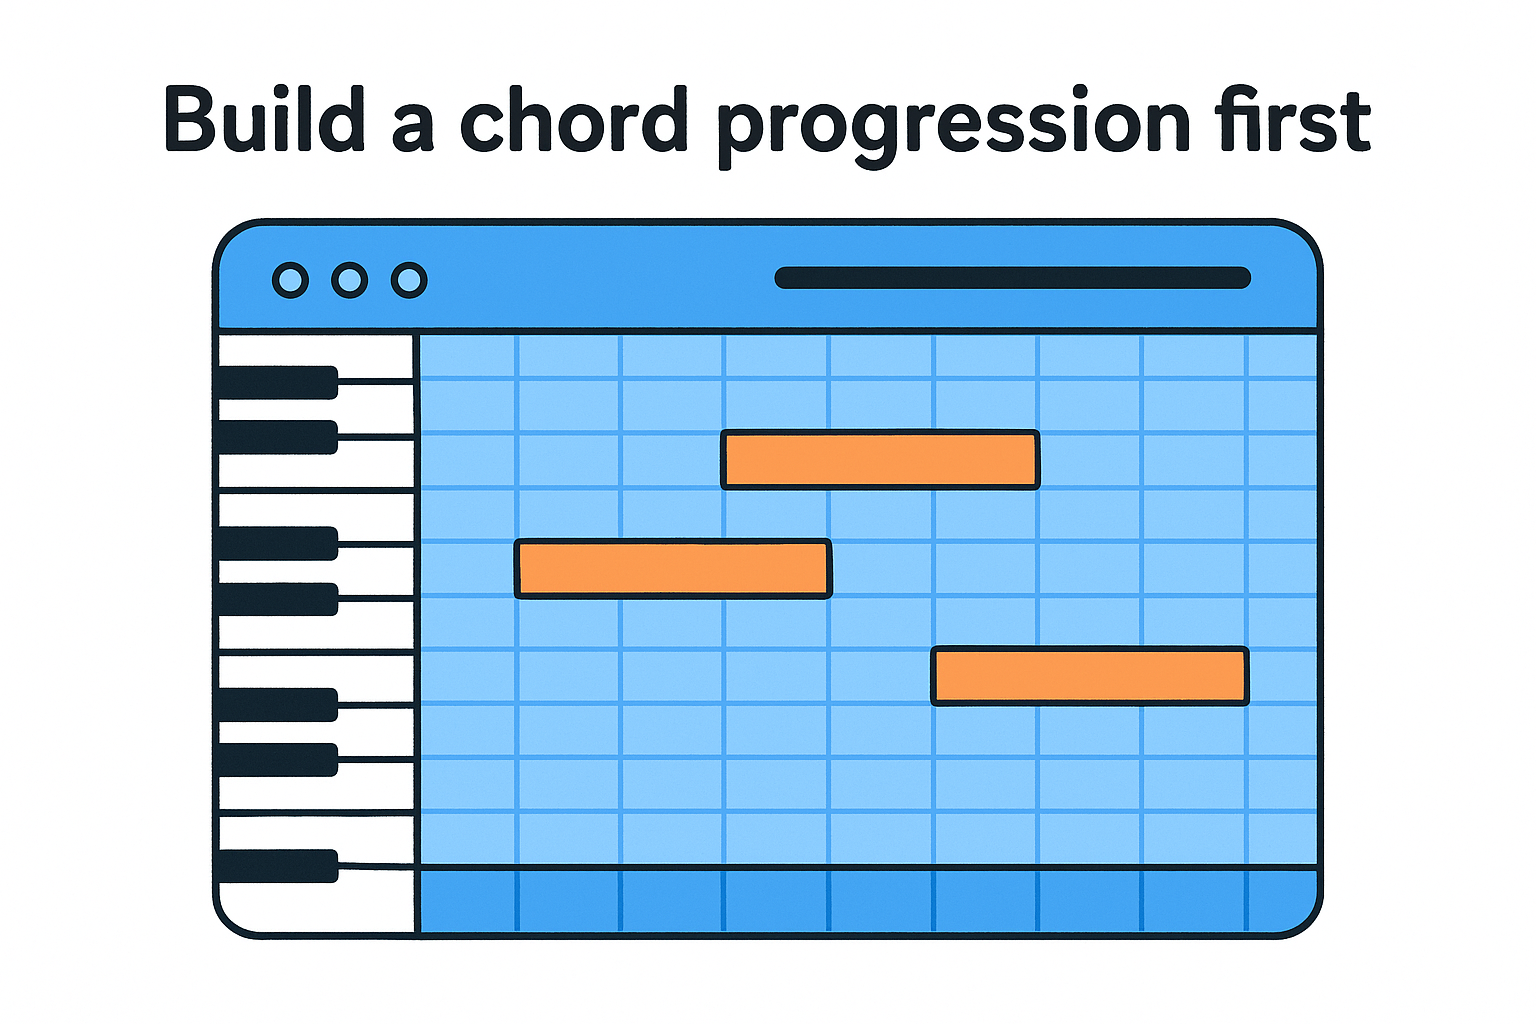
Keeping chords to three notes each prevents muddiness in the low-mid range, which matters especially when you add a bass later.
Here is a quick reference for the four chords in A minor using Piano Roll note names:
|
Chord
|
Notes
|
|
Am
|
A3, C4, E4
|
|
F
|
F3, A3, C4
|
|
C
|
C3, E3, G3
|
|
G
|
G3, B3, D4
|
Add a bassline that locks with the kick
Your bass and kick drum need to share rhythmic space without colliding. Create a new pattern in the Channel Rack, load a bass instrument (FL Studio's 3xOsc works well with a sine wave preset), and open its Piano Roll. Place bass notes at the same rhythmic positions as your kick hits, but one or two octaves lower than your chord root. For A minor, that means A1 or A2 on beats 1 and 3. Keep the note length short, around an eighth note, so the bass punches rather than sustains into the kick.
Layer in a simple melody
A melody in this fl studio tutorial context means a single-note line that moves above your chords. Stay within your A minor scale: A, B, C, D, E, F, G. Set your Piano Roll snap to 1/2 or 1/4 beat and sketch a short phrase using four to six notes that resolves back to A. Vary your note lengths and leave gaps between phrases. Silence is part of the melody, and short rests make the next note hit harder when it arrives.
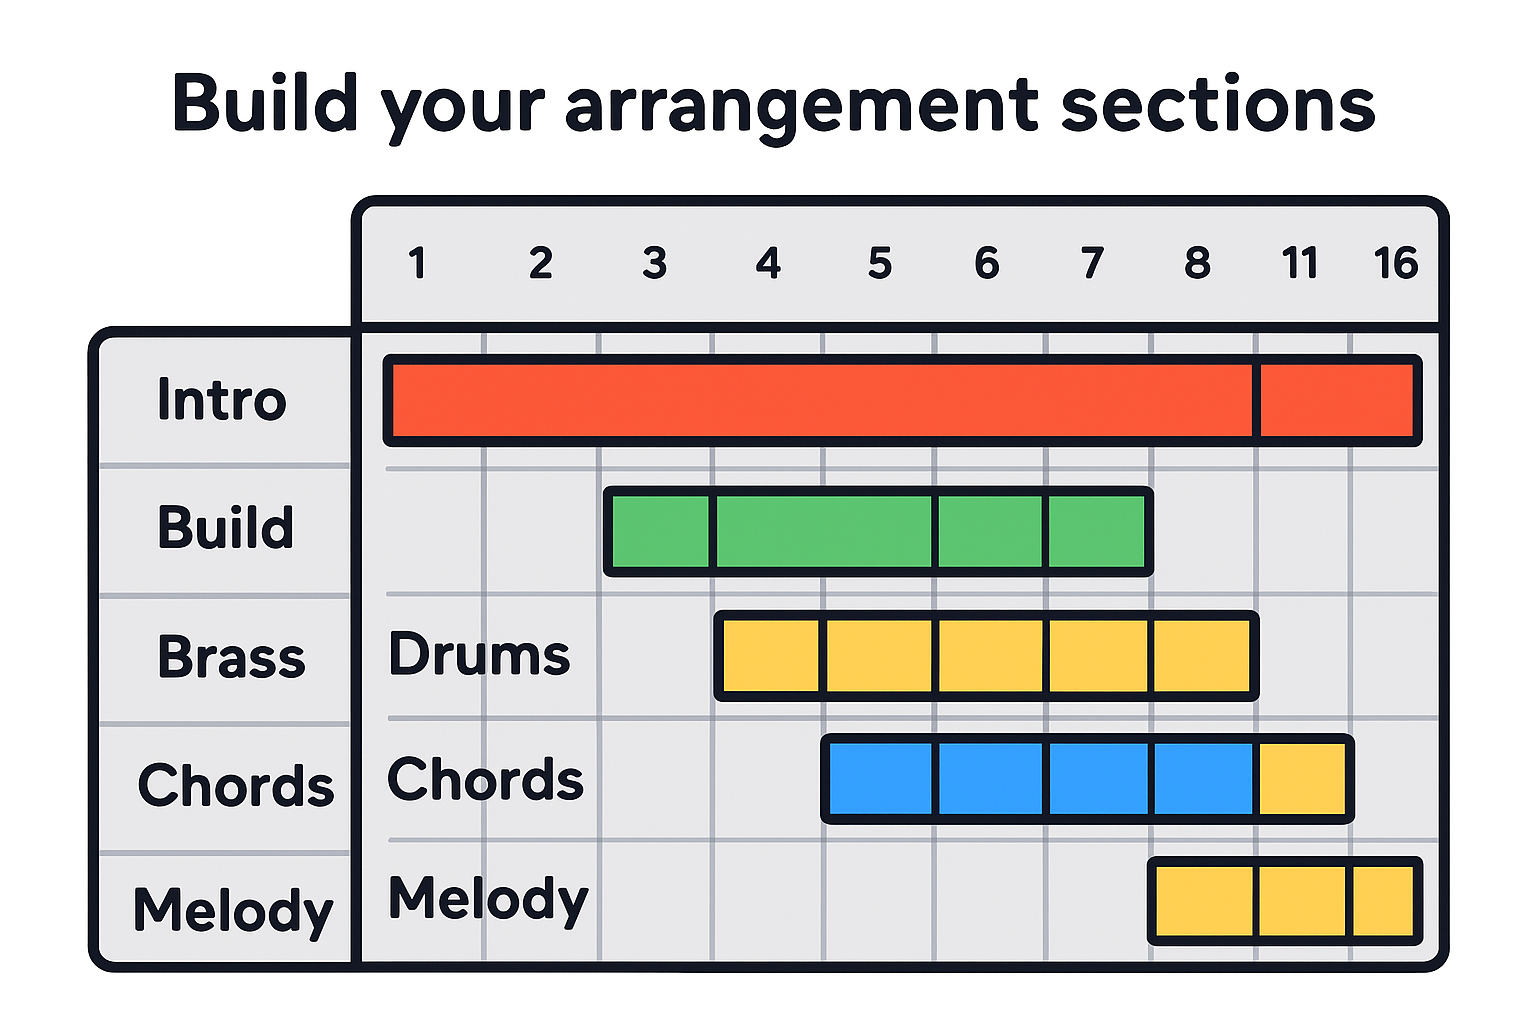
Arrange patterns into a full song in Playlist
The Playlist is where your individual patterns stop being loops and become a complete song. Every pattern you built in the Channel Rack, drums, chords, bass, and melody, appears as a block you can place anywhere along the timeline. Think of the Playlist as a visual map of your track, where you decide what plays, when it plays, and for how long.
Understand the Playlist grid
Each row in the Playlist represents one pattern or audio track. You place patterns by left-clicking on any row at the position where you want that pattern to start. Right-clicking removes a block. Dragging a block's right edge extends how many times it repeats. The horizontal axis measures time in bars, and most EDM tracks run between 64 and 128 bars for a full arrangement at around 3 to 4 minutes.
Naming your patterns clearly before placing them in the Playlist (like "Drums," "Chords," "Bass") saves you from confusion when you are managing 10 or more rows at once.
Build your arrangement in sections
Standard EDM tracks follow a recognizable structure that DJs can mix in and out of sets smoothly. Use this as your starting framework for this fl studio tutorial:
|
Section
|
Bar Range
|
What's Playing
|
|
Intro
|
1-16
|
Drums only or minimal elements
|
|
Build
|
17-32
|
Add chords and melody, strip kick
|
|
Drop
|
33-64
|
Full arrangement hits together
|
|
Break
|
65-80
|
Chords and atmosphere, no drums
|
|
Drop 2
|
81-112
|
Full arrangement returns
|
|
Outro
|
113-128
|
Gradually remove layers
|
Place each pattern in the correct row and bar range according to this structure. Your drum pattern fills every section except the break. Chords and melody stay out of the intro and return during the build. This framework gives your track a shape that listeners can follow without needing to think about it.
Use track color-coding to stay organized
FL Studio lets you right-click any Playlist track header to assign a color. Color your drums red, your bass blue, your chords green, and your melody yellow. This system takes about two minutes to set up and makes navigating a 128-bar arrangement significantly faster. When you return to a session after a break, you will locate every element immediately instead of scanning row by row trying to remember what each track contains.
Add automation and transitions that move
A static track with no movement feels flat, no matter how strong your chords and drums are. Automation lets you record or draw changes to any knob, fader, or parameter over time so your track evolves rather than just repeats. In FL Studio, you can automate almost anything, from a filter cutoff sweeping open before a drop to a reverb send rising during a breakdown. This is where this fl studio tutorial moves from loop-making into actual production craft.
Create automation clips for filter sweeps
Right-click any knob or slider in FL Studio and select "Create automation clip." FL Studio immediately adds a new pattern to your Playlist tied to that exact parameter. Double-click the automation clip to open the Automation Editor, which shows a horizontal lane where you draw a curve. For a filter sweep rising into a drop, click to place two points: one at the far left with the value set low (filter closed) and one at the far right with the value at maximum (filter fully open). Right-click the line between them and select "Curve" to turn that linear ramp into a smooth, tension-building arc.
A filter sweep works best when it starts 4 bars before your drop and finishes exactly on the first beat of bar 1, so the energy releases at the perfect moment.
Here is a quick reference for parameters worth automating in a basic EDM arrangement:
|
Parameter
|
Effect
|
Where to use it
|
|
Low-pass filter cutoff
|
Opens or closes brightness
|
4 bars before drop
|
|
Reverb send level
|
Adds or removes space
|
During break
|
|
Volume fader
|
Creates fade-ins and fade-outs
|
Intro and outro
|
|
Pitch of a synth
|
Creates risers or falls
|
Build sections
|
Build transitions between sections
Transitions connect your sections so the jump from build to drop feels intentional rather than abrupt. The two most reliable transition tools are a riser sample and a snare roll. Drag a riser sample (found in most free sample packs) into the Playlist and align its ending exactly on bar 33, the first bar of your drop. For a snare roll, duplicate your snare pattern in the Channel Rack, open its Piano Roll, and fill the last two bars with snare hits that double in speed every half bar, going from quarter notes to eighth notes to sixteenth notes. Layer both together and your drop will hit with real impact every time.
Route and mix your track in the Mixer
The Mixer is where raw patterns become a polished, balanced track. Without proper routing, all your instruments play through a single Master channel with no individual control, which makes it impossible to adjust one element without affecting everything else. This step in the fl studio tutorial is where you gain precise control over every sound you have built so far.
Assign every channel to a Mixer track
Every instrument in your Channel Rack needs its own dedicated Mixer channel before you touch a single fader. Click on any instrument in the Channel Rack to select it, then look at the top-right corner of the Channel Rack window where you will see a small number labeled "FX." Change that number to match the Mixer channel you want that instrument routed to. Assign your kick to Mixer channel 1, snare to 2, hi-hat to 3, bass to 4, chords to 5, and melody to 6. Your Master channel (channel 0) automatically receives the summed signal from all routed channels.
Here is a clean routing template to follow for a basic EDM track:
|
Mixer Channel
|
Instrument
|
Purpose
|
|
1
|
Kick
|
Sub and punch control
|
|
2
|
Snare
|
Transient shaping
|
|
3
|
Hi-hat
|
High-end control
|
|
4
|
Bass
|
Low-end management
|
|
5
|
Chords
|
Mid-range processing
|
|
6
|
Melody
|
Top-end sparkle
|
|
10
|
Reverb Return
|
Shared space send
|
Set levels and apply basic effects
With routing done, start your mix by setting levels, not by reaching for effects. Drag each fader so no channel clips the meter red and your Master channel peaks around -6dB. This headroom gives you space to add processing without the final output distorting. A good level balance before effects will always produce a cleaner result than trying to fix a chaotic mix with plugins.
Getting your dry levels balanced first means every effect you add afterward enhances the mix rather than masks a problem.
Once your levels sit correctly, place a parametric EQ on your kick and bass channels to carve out conflicting frequencies. In the Mixer, click the green arrow slot on a channel to open the effects chain, then insert Fruity Parametric EQ 2. Cut a narrow band around 200-300Hz on the bass if the kick sounds muddy. Finally, add a limiter on the Master channel using Fruity Limiter to prevent any output peaks from clipping on export.
Export your first track and avoid common issues
You have built a full arrangement, mixed your levels, and added a limiter to your Master channel. The last step in this fl studio tutorial is getting that audio out of FL Studio as a finished file. Exporting incorrectly can result in a track that clips, sounds hollow, or cuts off too early, none of which reflects the work you put in. Press F8 or go to File and select Export Audio to open the export window.
Choose the right export settings
The export window gives you several options, and selecting the wrong ones is the most common way beginners ruin an otherwise solid mix. Set your format to WAV for the highest quality output. MP3 is fine for sharing rough demos but introduces compression artifacts that reduce clarity. Set your bit depth to 24-bit for distribution-ready audio, which gives streaming platforms enough resolution to process your file cleanly..
25